How to connect to wireless network on WINDOWS 7 or Windows Vista computers ?
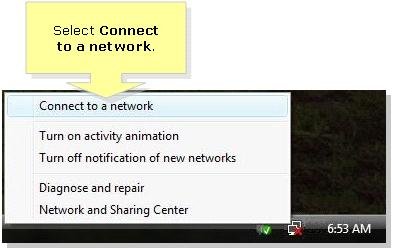
here are the simple steps to connect to the wireless network on Windows 7 or Windows Vista computer. On Windows 7 or Windows Vista computers, you will find the wireless network connection icon in the bottom right hand corner. Right click on that icon and go to connect to a network. You will see your SSID in the list. Select your SSID and click connect. If it is secured then you will need to enter the key or password. Enter the correct password and it will connect you to the network.
If you do not find the icon in the system tray then click Start. Go to Control Panel => Network and Sharing center.
On Windows Vista computer, you will see Connect to a network in the left Panel.
On Windows 7 computer you will see Connect to a Network on the middle of the page.
Errors when you connect to the wireless network on Windows 7 or Windows Vista :
- Settings saved on this computer do not match : Remove your SSID from the preferred network list and try to connect again. Click here for more information about this error.
- Press the configuration button : Skip this step and go to the next step. If your network is secured then enter the password. Click here for more information about this error
- Enter PIN number : Skip this step and go to the next step or manually add the SSID.
- Windows can not connect to the network: Make sure that you are entering the correct password for the wireless network and wireless MAC filter is disabled on the router. Try changing the channel.
- Additional log on information required : Manually add the SSID. Click here for more information about this error.
Follow the Easy steps of Easy set up Guide to connect to the wireless network on windows Vista or windows 7 computer.
Click here for easy steps to connect to the wireless network
Easy setup guide is designed to work with Linksys wireless router , Netgear wireless router, D Link wireless router and all other brands of routers.
WINDOWS 7 wireless connection not working.
I am now able to “see” the wireless connections but not connect when I click to access the connection. Friends who visit with their PC’s can access my home wireless after they login with the password if they are using Windows XP and/or Vista.
My Windows 7 is still an enigma!
How do I connect to the wireless network on my old windows vista laptop? I can not see any SSID but the other XP laptop can see one.
I have just bought new E4200 wireless router. I can connect my new windows 7 laptop but windows vista laptop is not connecting to the network. getting some error.
I am trying to connect my new windows 7 laptop to my existing wireless network. I have Linksys WRT160 wireless router. 3 other wireless laptops are connected and working. Just the new laptop is not working in the network.
I am trying to connect the new vista laptop to the wireless network and I need the SSID, WPA key for the network. i have my main computer connected to the router and it is working. I have wrt54g router. this is the first wireless computer that I am going to connect to the network.i never used the wireless computer in the network before.
I just got a new D link router. how do I create a secured wireless network. How can I connect. I have Dell laptop with Vista.
I have just bought the new Linksys E1000 router but I am not able to connec t on my XP laptop.
I think the security settings are not correct. I installed the cisco connect software but it is not opening.
Open the setup page of the router and check the settings of the router. Make sure that your computer will be wired to the router when you check the wireless settings.
I have just bought the new Linksys E1000 router but I am not able to connec t on my Vista laptop.
I think the security settings are not correct. I installed the cisco connect software but it is not opening.
If the Cisco connect software is not working then you can open the setup page of the router manually and change the settings. Use the main computer to access the setup page of the router. connect the main computer to the router with the cable.
My new Vista laptop is not connecting !!
I have Linksys WRT160N and I am having difficulty connecting on my Windows Vista laptop.
Hey ! My new Vista laptop is connected to the wireless network . I was getting the error about press the configuration button.
My new Vista laptop is not connecting to the network. I can not see any SSID. The other laptop can see all the networks.
Not connecting to the SSID on my windows vista laptop. It can see the network but not letting me to connect. The connect button is not highlighted.
I think connecting to the wireless network on windows Vista computer is easier than windows XP.
Thanks for using Easy set up guide. I believe you are now able to connect to the wireless network on your new vista laptop.