Linksys EA8300 setup – Manual – Firmware Troubleshooting
The Linksys EA8300 setup is easy and it does not require CD. You can go for a manual setup or do it using software also. Like other Linksys routers, Open the settings page and change the settings manually. We will also discuss about firmware upgrade and troubleshooting.
You can setup Linksys EA8300 router in 2 different ways.
Using web interface of the router, we can install EA8300 manually by opening Linksys EA8300 setup page and change the settings manually like other WRT series older routers. And I think this is very simple process.
Setting up the Linksys Smart Wi-Fi Router is made easy using the Smart Setup Wizard. It is embedded in the firmware and is available even if the router does not have an Internet connection or is in its default settings.
Watch Linksys EA8300 setup video
Linksys EA8300 setup without CD or manual installation.
The Linksys EA8300 router setup is simple and only requires a few steps to finish. The router must first be connected to your modem with an Ethernet connection. Subsequently, attach your computer or mobile device to the router’s Wi-Fi network or using an additional Ethernet cable.
The default IP address of the router can be located in the user manual or on the bottom of the router. Then, launch a web browser and type that address. You may configure your router’s settings, such as your network name and password, security settings, and parental controls, on the web-based setup page for the router by clicking this.
Step 1: Check Internet connection through modem
First make sure that your modem is working. Connect your main computer directly to the modem. Make sure that your main computer is able to access Internet directly through the modem. If you are not able to access internet directly through the modem then contact your service provider and get your modem working first.
In case of DSL connection, you may not be able to access the Internet directly through the modem. In this case you must have PPPoE User name and password from the DSL company.
Make sure that you have the correct PPPoE user name and password. if you do not have PPPoE user name and password then get in touch with your Internet service provider and get it.
Step 2: Make connections to the router
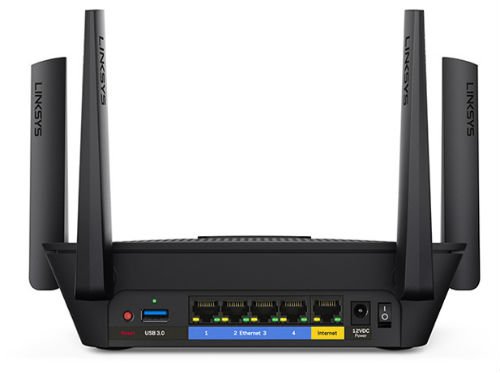
Connect the computer and modem to the Linksys EA8300 router with the Ethernet cable. Connect the modem to the Internet port (which is standing alone ) and computer to the Ethernet port.
If you connect the modem and computer to the wrong port, you will not be able to open the Linksys router setup page. If you have computer connected to the WAN port then it will not communicate with EA8300.
Connection is very important. You will see 4 lights, Power, WAN, wireless and Ethernet.
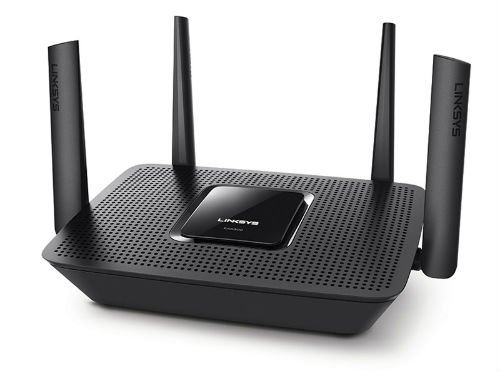
Linksys EA300 setup – front and back panel images below
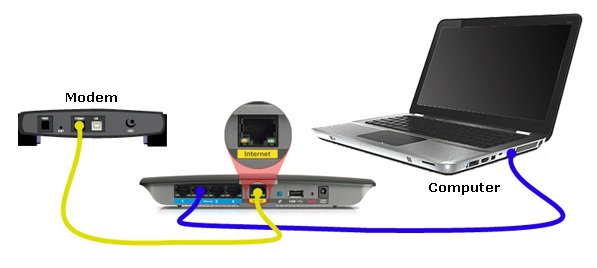
Basic Modem – Router – Computer connection image below
Watch the Basic initial connection video.
Step 3: Open setup page
Open browser and in the address bar type the number 192.168.1.1 . This is the default IP address of almost all the models of Linksys Routers. However you can open the command prompt and check the IP address on your computer.

Enter your Router Password then click Log in. The default password is admin. If you have changed it, enter the new password instead.
If the default password is not working then you can reset the device to the factory default. Press and hold the reset button for 10 seconds. Release the reset button and wait for 30 seconds. Power cycle the router.
Remember, if you reset the device, it will come back to factory default settings and you will lose all the existing settings. If this is a brand new device or you are starting from scratch, then start with resetting the device.
You will see Linksys EA8300 setup page on your screen.
Step 4: Change Internet connection settings.
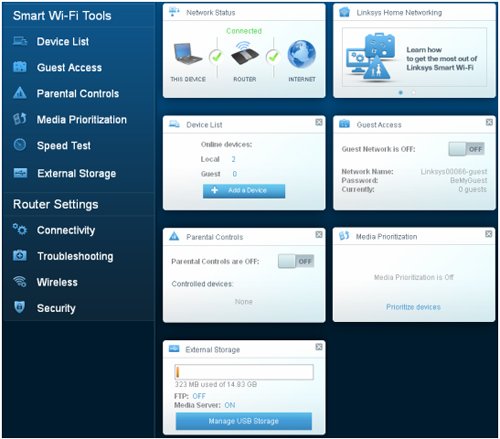
In the left panel, you will see all the options required to change the settings. Click on “Connectivity” under router settings section.
Click On Internet settings tab at the top.
Now according to your internet service provider, you can change the Internet settings.
Please check the images below for appropriate Internet service provider settings. There will be 2 types of ISPs. Cable ISP and DSL ISP.
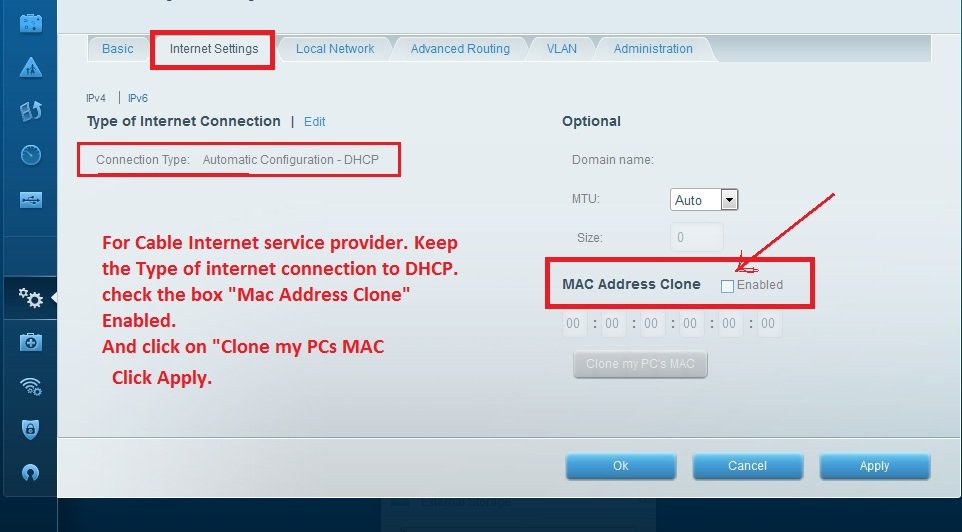
Internet connection settings for Cable ISP
For Cable ISP , you need to clone the MAC address of your computer, as shows in the image below. Then power cycle the network.
Internet connection settings for DSL ISP
For DSL ISP, you need to enter the PPPoE user name and password as shown in the image below.

Once you change the Internet connections, you wired computer will be able to access the Internet through the EA8300.
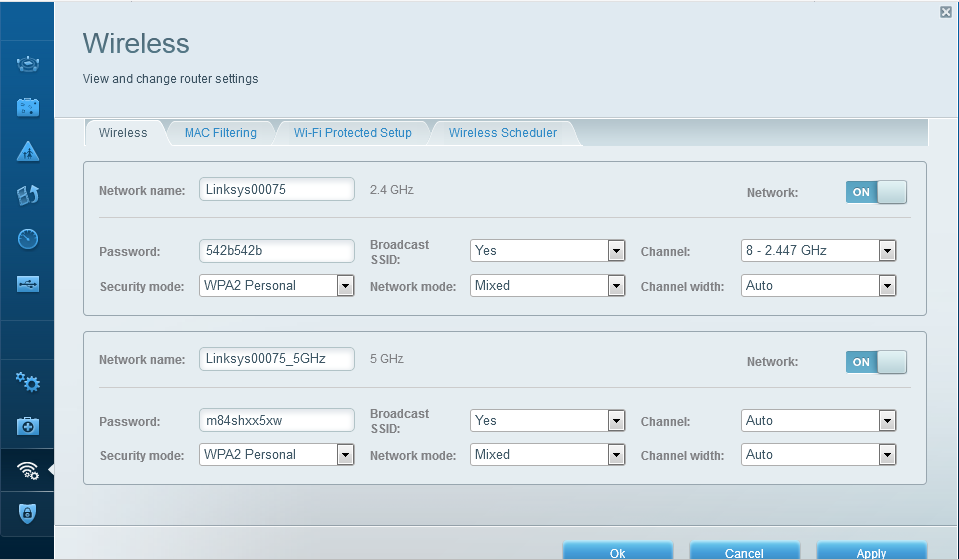
Step 6: Change Wireless network settings.
Change the Wireless network Settings as shown in the image below.
As this is a Dual band router, you will see 2 different wireless networks.
SSID is the name of the wireless network. Change both SSIDs. Keep the names of both the SSIDs different so that you can identify them.
Change the password for the wireless network ( remember this password ). This will be the password of the wireless network and you will need this password / key when you will try to connect any wireless computer or device to the network.
Step 7: Connect to wireless network
Now try to connect different computer or wireless devices to the network and see if that works. It will ask you to enter the wireless network password. Enter the correct wireless network password and you will be able to connect to the Wi-Fi network. Try to access Internet on wireless devices.
Now the wired and wireless network are setup and working properly.
Step 8: Create Guest Network access
Linksys EA8300 router does support Guest network access. Guest network is a completely different than main wireless network. You can allow your guests to connect to the separate Wi-Fi network so that they can not get in to your private wireless network.
In the left panel, you will see the option to setup Guest access. Turn it ON. Edit the guest network password and that’s it. You can also control how many guests can connect to Wi-Fi.
This was all about Linksys EA8300 setup manually.
Linksys EA8300 setup using the Smart Setup Wizard
Requirements before Linksys EA8300 setup
The following requirements should be met to avoid any problems during the setup:
- Browser requirements for the router setup and Linksys Smart Wi-Fi access:
- Microsoft Edge™
- Internet Explorer® 8 or higher
- Latest version of Chrome™ and Firefox®
- Safari® (for Mac® or iPad®)
- Latest Adobe Flash® Player?
- Materials for setup – You should have the following items:
- Linksys Smart Wi-Fi Router
- One (1) or two (2) Internet / Ethernet (RJ-45) cables
- A wireless computer or a computer with an Ethernet port
- Active Internet connection – To check if you are able to access the Internet, connect the modem to the computer using an Ethernet cable as shown in the image below:
If you do not have modem then connect the cable (also called a patch or a fiber optic cable) provided by your Internet Service Provider (ISP) directly to the computer’s Ethernet port.
Step 1: If your EA8300 came with external antennas, connect the antennas to the router first and then plug in the router to a power source. If your router has a power switch, make sure that the power switch is set to the | (ON) position. Wait until the power LED is solid.
Step 2: Connect the Ethernet cable from your modem to the Internet port of the EA8300.
Step 3: Connect to your secured wireless network. You can locate the wireless credentials either at the bottom of the router or on the Quick Start Guide. To prevent any problems during setup, make sure you have a good signal from the router or bring the wireless computer closer to the same room as the EA8300.
NOTE: If you are using a wired computer, skip Step 3 and proceed to Step 4.
Step 4: Launch your web browser and enter “http://linksyssmartwifi.com” in the Address bar then press [Enter].
Step 5: Tick the checkbox beside I have read and accepted the License Terms for using this software then click Next to proceed.
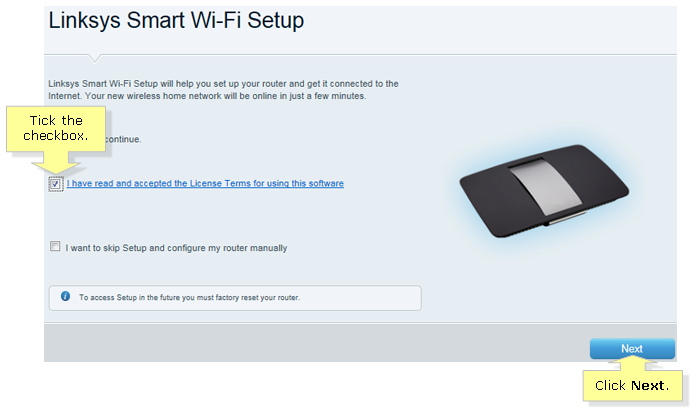
If the Smart Setup screen does not show up, press the Reset button at the back of the router for 10 seconds, turn the router OFF and then turn it back ON. Wait a few seconds for the router to boot up and start at Step 1 again.
If no Internet connection is detected, the Your Internet cable is not connected correctly window will appear. Follow the suggested troubleshooting steps on the screen to resolve your connection problem then click Next.
Step 6: If you are having issues with EA8300 router setup and configuration then you can make sure that your router is running on the latest firmware. If not then download and upgrade the firmware of the router.
Follow the instructions for for Linksys EA8300 router setup using smart setup wizard
How to upgrade Linksys EA8300 Firmware:
You can download the Linksys EA8300 manual from Linksys website. Click here to download the device manual. But I do not think that there is enough information in the manual. You will find device and its information there though.
Before upgrading the firmware, make sure that your computer is connected with the Ethernet cable. Do not upgrade firmware using wireless computer.
Download the Firmware from Linksys website and save it on your wired computer. If the firmware you downloaded is a .zip file, you need to unzip it before you proceed with the upgrade process
Login to your router’s setup page by using 192.168.1.1
Go To “Connectivity”. There in the right side, you will see option for Firmware upgrade. Now you can do it automatically by clicking on checkbox Automatic and check for updates button. Or you can do it manually by click on Choose file. Select the downloaded firmware file. And click Start.
Wait for the firmware upgrade to finish.
How to Reset Linksys EA8300 router?
Before you reset Linksys EA8300 router, be aware that the router will come back to factory default settings. So if your network is already working properly and you have small trouble then avoid resetting the device. In stead look for other solution.
On the rear side of EA8300, there is a small reset button. Press and hold it down for 30 seconds. The power light will start blinking. Release the button.
Unplug the power cable. Wait for 10 seconds. Now Plugin the power cable. Wait for 30 seconds and let the power light become solid.
Now the device is back to factory default settings. You need to re-configure it. Follow the instructions explained above to setup Linksys EA8300 manually.
Linksys EA8300 default password:
The default IP address is 192.168.1.1 and the password is “admin”. Leave the user name blank.
There are 3 different types of passwords used the wireless network. If you are trying to add a wireless device in the network and it is asking you for a password then it must be wireless network password. Not Router password.
Router password: This is the main password of the router used to open the settings page. And you do not really require this password so often unless you want to make network changes.
Wireless Network key: This is the password required to connect to the Wifi Network. You can find this wireless network key on the settings page under wireless settings.
Guest Network password: This router creates separate Wifi network for guests. SO your guests can access limited Guest network without entering in to main Wifi.
So do not get confused with default router password, wireless network key, guest network access.
Buy New Linksys router
Linksys EA8300 router features
Linksys EA8300 router is a Max-Stream AC2200 Tri-Band Wi-Fi Router. It has Intelligent Tri-Band for double the performance of a Dual-Band Router. Three bands that deliver the fastest combined Wi-Fi speeds to more devices. It works on latest Wireless-AC technology for simultaneously streaming and gaming on multiple devices.
Tri-Band Technology
Three bands that deliver the fastest combined Wi-Fi speeds to more devices.
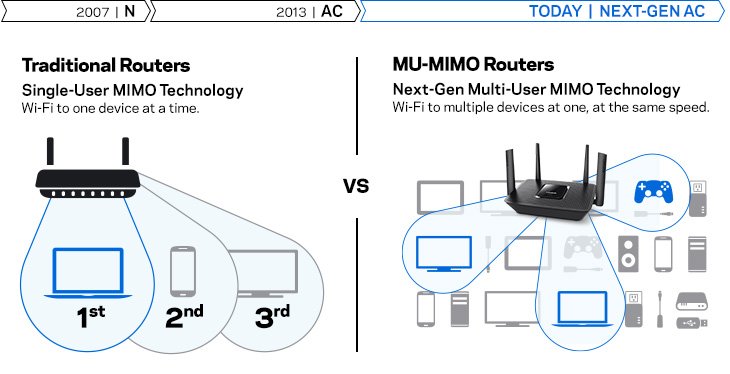
MU-MIMO
Latest Wireless-AC technology for simultaneously streaming and gaming on multiple devices.
Seamless Roaming
Enables your device to automatically switch to the strongest Wi-Fi signal as you move around your house when Max-Stream Routers are paired with Max-Stream Range Extenders.
DOUBLE THE PERFORMANCE OF A DUAL-BAND ROUTER
Enjoy up to double the performance* of a Dual-Band router with the Linksys MAX-STREAM AC2200 MU-MIMO Wi-Fi Tri-Band Router (EA8300). Featuring Tri-Band technology, the MAX-STREAM AC2200 is ideal for 4K and HD video streaming and next-gen online gaming.
Households with heavy Wi-Fi use will experience fast data transfers thanks to this gigabit Wi-Fi router’s combined 2.2Gbps speed and Quad-Core CPU.
EXCEPTIONAL MULTI-DEVICE PERFORMANCE WITH MU-MIMO
Devices such as 4K TVs, HD streaming media players, tablets, and game consoles consume a lot of bandwidth. With MU-MIMO (Multi-User Multiple-Input Multiple-Output) technology, the EA8300 router sends Wi-Fi to multiple devices at the same time and same speed. It’s like having a dedicated Wi-Fi router for each of your devices.
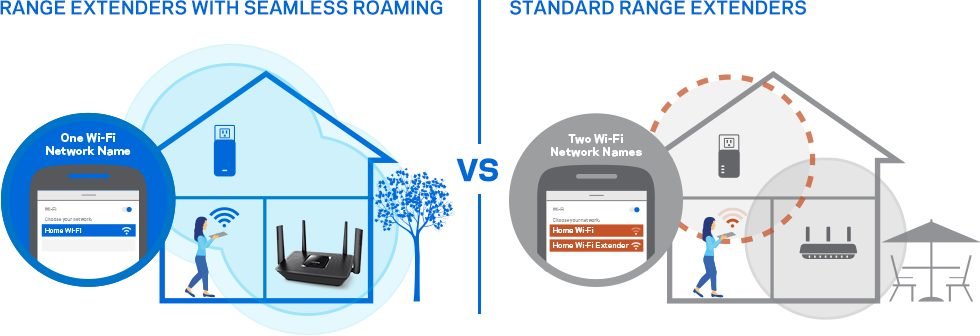
SEAMLESS ROAMING TECHNOLOGY
Traditional routers and range extenders force you to manually connect to either the range extender’s or router’s network in order to experience the best Wi-Fi signal as you move about your home. But with the EA8300’s Seamless Roaming support, your devices will automatically connect to the strongest Wi-Fi signal by utilizing a single network name. Pair the router with a compatible range extender to enjoy a strong, seamless Wi-Fi signal in every room of your house.
HIGH-PERFORMANCE ANTENNAS FOR MAXIMUM COVERAGE
The EA8300 wireless router features four external adjustable antennas that provide four powerful streams of data to your devices–ensuring complete coverage of your home. Better coverage means faster Internet speeds wherever you are.
LINKSYS AUTO FIRMWARE UPGRADE
Linksys automatically pushes the software update to your router overnight and seamlessly bring the latest features and security to your home network. Your Linksys router will be consistently getting better over time.
Three features that will soon be added to the EA8300 are DFS Channels Support, an OpenVPN Server, and Advanced Band Steering.
WI-FI TRAFFIC OPTIMIZER
The Smart Connect feature balances your 5 GHz Wi-Fi connections and intelligently chooses the best radio band for your devices for the best Wi-Fi performance of your network.
DOWNLOAD/UPLOAD SPEED CHECK
Clearly see your network’s Download and Upload speeds with a more intuitive speed gauge in the User Interface.
SPI FIREWALL AND DOS PROTECTION
Linksys SPI Firewall will distinguish legitimate packets for different types of connections. Only packets matching a known active connection are allowed to pass the firewall. DoS attack is an attempt to make a computer or network resource unavailable to its intended users, with Linksys DoS protection, we will block all the possible DoS attack to keep your network running smoothly.
Very nice article on Linksys EA8300 setup. Just do it manually instead of smart wizard. Open the settings page and change the settings manually. It is that easy of you have the basic computer knowledge.
I am trying to change the Wifi password of the network. I tried to login to ea8300 setup page but it is not working. It is looking for router password. I entered the correct router password but it is not accepting it. I also tried default password but that did not work either. Do I need to reset it now? I hate to reset it.
I recently connected my wireless linksys ea8300 router to the modem from spectrum. The modem from spectrum came with wifi, but they charged and it wasn’t as good. it was the DG1670A. I set up my ethernet cord to go from the modem (DG) to my wifi router. I then connected everything else to it. This included a pc into a lan port. Well I started getting disconnected a lot and learned I had to clone my PC to the router, which I did and all my problems disappeared.