Linksys Velop Setup – FAQs – Troubleshooting – Bridge Mode
Trying Linksys Velop Setup? Here are some simple steps which will help you setup Linksys velop quickly. We will also discuss about various troubleshooting steps and how to setup Linksys velop bridge mode.
We will discuss about following topics in this article:
Watch Linksys Velop Setup video:
What is Linksys WiFI Mesh System?
Before going through Linksys Velop Setup, let us understand what WiFi mesh system is and Velop is in short.
Linksys Velop is a high-performing modular Wi-Fi mesh system of nodes built to provide exceptional Wi-Fi coverage throughout your home. It sets up in minutes and delivers a flawless, ultra-fast, full-strength signal.
Mesh Wi-Fi or Whole Home Wi-Fi systems consists of the main router that connects directly to your modem, and a series of satellite modules, or nodes, placed around your house for full Wi-Fi coverage.
They are all part of a single wireless network and share the same SSID and password, unlike traditional wireless routers.
Linksys Velop Setup comes in package of 1 Node, 2 Nodes, 3 Nodes. Depending on your requirements, you can purchase any of the package.
First check ports on Linksys Velop device.
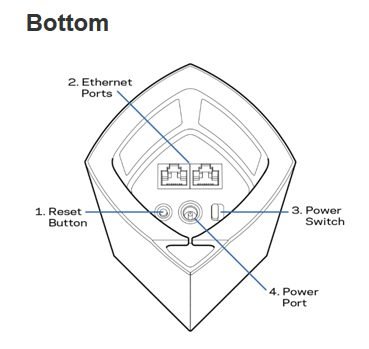
Unlike other traditional Linksys routers, this device has Ports at the bottom of the device. On the other Linksys routers, you will find connection ports on the rear side of the device.
This device contains 2 Ethernet ports. You can connect your primary node with your Internet modem or modem/route to one of the Ethernet port on Node.
There is a small reset button to reset the device to factory default settings.
Power switch to turn it on or Off .
Initial Connections of Linksys Velop setup:
You need to have an active internet connection. So there will existing Modem or modem/router given by your Internet service provider. The Primary node will be connected to the Modem or modem/router with the Ethernet cable.
In case of other Linksys routers, you need to connect one computer or laptop to the router for the initial configuration. But in the case of the Linksys Velop setup, you do not need any computer.
This system can be configured using a mobile. You need to download and install the Linksys Velop App on your Android or Apple device. Using this App, you can set up the device easily.
Download Linksys Velop App on your mobile.
Connect the Internet modem to the Velop.
Take the Ethernet cable that comes with the device and connect it to Internet modem and Velop Ethernet port. Plugin the power cable to turn on the device. While Starting up the Node, you will see Blinking Blue Light. When the Blue light is solid, the Node is turned On and working.
Set up primary Node using Linksys Velop App.
You may have single node package or 2 or 3 nodes package. First, you will need to setup primary. This primary node will be conneted to the Internet modem.
Linksys Velop Setup steps using Linksys App:
- Launch the Linksys App.
- Tap on Launch Setup.
- Select Velop System from the option.
- Agree to Terms and Conditions to continue. It will appear only for the first time.
- Your Mobile Bluetooth connection will be used to configure the system, so I will ask you to turn on Bluetooth on your mobile. In case if it asks to turn on Location then turn on the Location Access also.
- Now the App will look for the Primary Node in the network, and it will try to connect to it automatically till it finds the device.
- Tap Next
- The program will check for the Internet connection. In case of PPPoE Internet connection type, the program will not find Internet connection if it is connected directly to the modem. Here click on the link that says I want to enter my ISP settings manually. Now enter the PPPoE User name and password. Click Next. In some cases, ISP may give you Static IP address settings. Enter the Static WAN IP address given by ISP.
- It will now ask you to create a Linksys Cloud account. Create a new account by entering Email address and password and go NEXT. If you already have an account then click on Log in.
- Now you will see the option to change Wireless network settings. SSID will be the name of your wireless network and password to connect to the Wi-Fi network. So do remember these settings while entering them. Click on NEXT.
- It may now ask you to connect to Wi-Fi network on your mobile device. Search for the Wi-Fi network that you just created. Enter the password and connect to your new wireless network. While connecting to your Wi-Fi, you might close the Linksys App. Reopen it to continue the setup process.
- The program will not Configure your Velop network. Select the location of your primary node so that you can identify the nodes. The location can be Living Room, Family room, dining room, office, etc. If you want to name if differently then you can click on the link “Name it something else” and then enter a new name for primary node.
- If everything is okay, then it will give you a success message.
That’s it! You have configured the primary device. If you want to add another Node, then Tap on “Add another node” and follow these instructions to add another node. If not then tap on “That’s it for Now.”
Linksys Velop Setup – Wired connection
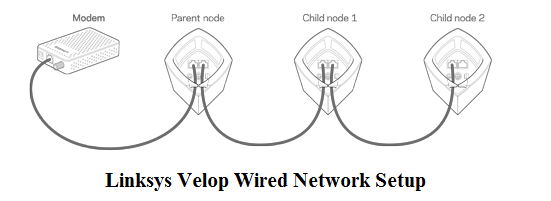
Your Primary Node is installed, and now you want to add more Nodes to the Network. You can connect the additional node to the primary device using Wired Ethernet connection.
In the case of many homes or offices, there is a wired Ethernet connection across the office or home. You can take advantage of this wired connection and connect the nodes to each other using Ethernet cables.
If you do not have enough wired connection, then no need to worry. Nodes can be connected to each other with wireless connection also (provided there are not too many obstructions and long-distance).
There are advantages of using a wired connection. Wiring nodes together can increase the range of your Velop system, increase speeds, and reduce the risk of wireless interference.
Each Node has 2 Ethernet ports. We have connected 1 Ethernet port of Primary device to the Internet modem. There is one more Ethernet port remaining on the primary device. Connect that extra Ethernet port on primary device to the Wall connection that will go to other additional Node.
In the case of a Wired connection, you do not need to do anything. Connect nodes with Ethernet cables. The Velop will automatically switch to a wired connection. So this is very easy Linksys Velop Setup.
Linksys Velop Setup – Wireless connection
Your Primary Node is installed, and now you want to add more Nodes to the Network. If you do not have wired ethernet connection across the home or office, then you can connect nodes with a wireless connection.
Two nodes can communicate with each other with wirelessly. Make sure that there are not too many obstructions and not long distance. If the distance is too far, then App will tell you that the device is not getting a proper signal from another node. In this case, you will need to reduce the distance or remove obstructions.

Adding Node to existing Linksys Velop setup network.
If you are adding a new node with the wired connection, then you do not need to do anything. Just plug-in power to the device and connect Ethernet cable to the device that goes to primary or other existing nodes. Wait for the device to turn on. Wait for the Blue light to become stable. Once it is solid blue, then it is working.
In case of a wireless connection between node, you need to configure the new device using Linksys App.
- Plugin the power to the device.
- Launch Linksys App on your mobile and login.
- Tap on Menu icon. Select the option at the bottom “Setup a New Product”
- Select Add nodes to existing Wifi Network.
- Tap Next.
- It will ask you to turn the Bluetooth ON.
- The setup will look for the new device automatically. Once it is detected, it will try to make a connection.
- It will automatically connect the new node to the network, and you will get a success message.
- The program will also check for the distance between nodes. If it is too close, then it will suggest you increase the distance. If it is too far, then it will suggest you to reduce the distance. Adjust the distance and tap Try again.
- Like primary node, set the location of the new device. And you are done.
How to setup Linksys Velop Bridge Mode
Bridge mode allows you to add your Velop Intelligent Mesh Wi-Fi system to existing Wi-Fi. For example, if you have an existing router or modem router (gateway) and you want to continue using it as your router, then you can add a Velop system to increase your Wi-Fi range.
In this case, Velop will not have its own network. All the nodes will be part of an existing Wi-Fi network. It will act like Range extender. I would not recommend you to use this powerful device in bridge mode. Instead of bridge mode, make Velop as the primary router and existing Wireless router in bridge mode. Click here to see how to use it with an existing router.
Below are the steps to setup Linksys Velop Bridge mode:
- Log in to the dashboard of the Linksys app.
- Tap the Menu Icon.
- Tap Advanced Settings, and then tap Internet Settings.
- In the Internet Settings page, tap the Connection Type field or arrow.
- Change the Connection Type to Bridge Mode.
- NOTE: If you don’t see the Bridge Mode option, make sure you are using the latest Linksys app version and your Velop nodes have the latest firmware.
- Tap Save.
- Tap Enable Bridge Mode when you are ready.
While saving your settings, your devices may temporarily disconnect. Once your internet connection comes back, you will be taken back to the dashboard of the Linksys app.
The dashboard will display Your Velop is in bridge mode to indicate that you have successfully set your system to bridge mode. Once the node is in bridge mode, the primary node must always be connected via an ethernet cable to your existing router.
The secondary nodes can be connected wirelessly or with an ethernet cable. Following features will be disabled when you setup Liinksys Velop bridge mode.
Device List, Speed Check, Parental Controls, Device Prioritization, Port Forwarding, and Wi-FiMAC Filters do not work when your Velop is in Bridge Mode.
Advantages of using Linksys Velop setup instead of Range Extender:
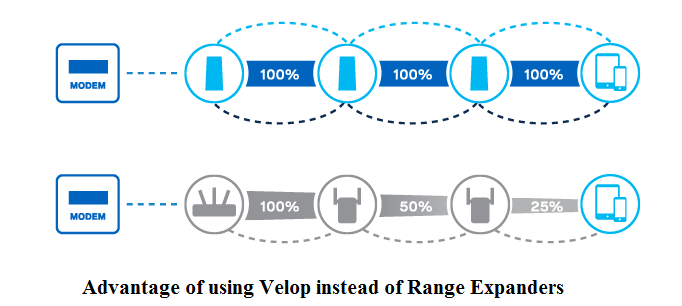
Instead of relying on a single WiFi router at one end of your home, you can place several Velop hotspots around the house to create a mesh network. It looks like a single WiFi network to all your wireless gadgets. Your gadgets can seamlessly jump between Velop nodes as you move around the house, depending on the strongest signal, which is like your mobile switches between mobile towers.
It is using Single network throughout the office or home where you do not need to jump over to the connection manually.
Using Range Extender will reduce the WiFi Speed of the network. The image below explains how the range extender will affect speed.
Linksys Velop Setup – Speed Check:
- Login to Velop’s Web Interface. Launch a web browser and enter “www.linksyssmartwifi.com” in the Address bar.
- Enter your Linksys cloud account credentials, then click Sign In. You can also click the link next to For local access and enter your admin password in the field. Then, click Sign In.
- Once you’re in the Dashboard, click on Speed Check.
- Once you enter the Speed Check section, a Test Ping will automatically begin.
- The Download speed is the rate at which internet content is transferred to your Velop system. The Upload Speed represents how quickly you can upload content to the internet.
If you have Linksys App installed on your mobile, then you can open the Linksys App. Log in to App. Tap on Main Menu, and you will see the option for a Speed check. Using your mobile device, you can check the speed of the network.
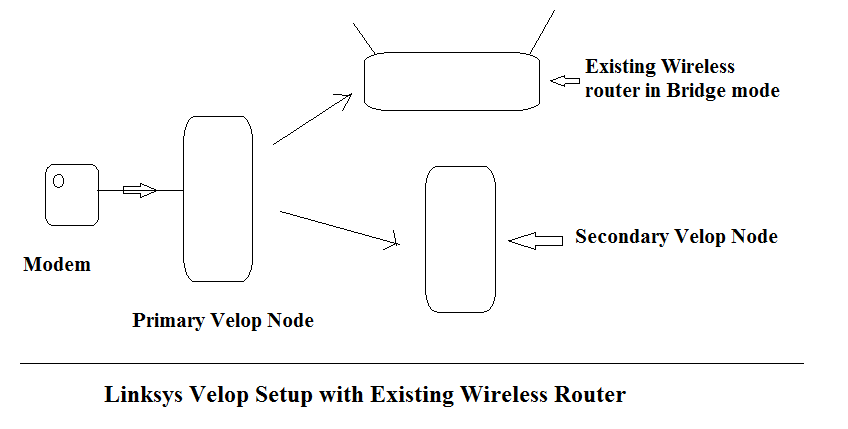
Linksys Velop Setup with Existing Router
Yes, you can use a Linksys Velop setup with existing router (wired or wireless).
Connecting Velop to existing router is easy and it is just like using 2 routers in a single network (LAN to LAN connection).
Let us consider; you already have a existing router in the network. The router is connected to the Internet modem. Now you want to use Velop system to increase signal strength or increase Wi-Fi area.
Linksys Velop setup with existing router Wired:
You have a wired router connecting to the modem, and you currently do not have Wi-Fi setup. In this case, you can connect the primary node to the Ethernet port on a Wired router.
The primary node will automatically get Internet through the router, and it will create Wifi network. Just run the app and configure it as explained in this article above. Check How to setup the Linksys router with the modem.
Linksys Velop setup with existing Wireless router:
You already have a wireless network setup with an existing router, and your current wireless router is connected to the modem. In this case, you can set up your primary node as bridge mode. But we have heard some issues bridging the Velop with the existing wifi router.
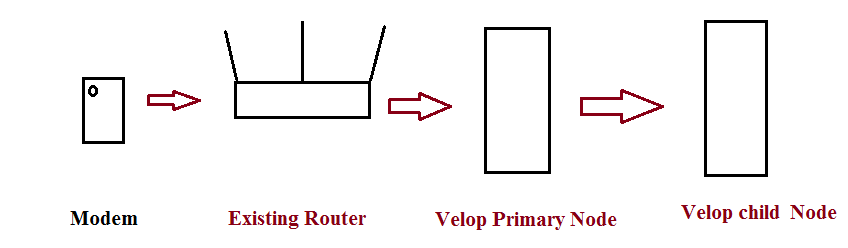
I would recommend you connect the Velop to the Internet modem.
And set the primary Velop as the main router. Then connect your existing wireless router to the Velop in Bridge mode. and connect other Velop nodes to primary node. So the connection will be like below image.
Frequently Asked Questions
FAQs
- How many nodes can you add to Linksys Velop?
- Do I need to use computer to setup Velop?
- How to connect 2 Velop nodes with each other? Wired or wireless?
- Does Linksys Velop have parental control and other settings?
- Does Velop have Guest Access Feature?
- How to change Velop Admin Password?
- How to upgrade Velop Firmware?
- What is Channel Finder Feature in Linksys Velop?
- How to Reset Velop?
- Is Linksys Velop Router?
- Where do I find Linksys Velop Manual
Q: How many Velop nodes can you add to Linksys Velop?
According to Linksys tech support on their forum – Each Node can handle up to 32 users. So if you have 100 users, then 4 nodes will be sufficient. The maximum number of nodes that can be added is still being tested by Linksys Engineering team, but currently, they have tested up to six nodes.
Q: Do I need to use computer to setup Velop?
No, you do not need a computer for initial configuration. You can do it using Linksys App, which you can download on your android or iOS.
Q: How to connect 2 Velop nodes with each other? Wired or wireless?
You can connect 2 nodes with Wired as well as a wireless connection. 2 Nodes can communicate with wired as well as wirelessly. For better speed and network use wired connection between 2 need if wires are available across the Home or Office.
Q: Does Velop have parental control and other settings?
Yes, It does have Parental control settings and Guest Network access also. You can block up to 10 specific websites.
Q: Does Velop have Guest Access Feature?
Yes, it does have the Guest Access feature. Guest Access is a way for guests in your home to use your internet connection without having access to your other computers or devices in the network. Log in to the Linksys app and access your Velop dashboard. Tap the Menu icon. Tap Guest Access and toggle the switch to the ON position to enable Guest Access.
The default Guest name is _VelopSetupxxx-guest and BeMyGuest is the default password. It is strongly recommended that you enable Guest Access and rename your Guest Wi-Fi name and password.
Q: How do I change Velop Admin Password?
During setup, Velop creates a secured system-generated admin password. You can change the admin password through Linksys App or through web interface.
Using Linksys APP: Login to App. Click Menu. Go To Administration. Tap Change Velop Password and Hint. Enter your new password in the field. You can also create an optional password hint.
Using Web Interface: Login to Web Interface. Go to Connectivity under Router settings. click Edit next to Admin Password and enter your preferred password. You can also add an optional Password hint.
Q: How do I upgrade Linksys Velop Firmware?
On your mobile device, launch the Linksys app. Tap the Menu icon. Tap the Velop Administration feature. By default, the Automatic Firmware Update feature is enabled. It will update firmware whenever there is new version available. If you are using more than one node in your network, each node will be updated. If you turn OFF Automatic Firmware Update, you will get a prompt when a new firmware release is available. When this happens, tap Update Available to upgrade the firmware.
Q: What is Channel Finder Feature in velop?
Wireless signals broadcast on multiple channels. The more number of Wireless networks that use the same channel, the worse the performance will be for each of them. Channel Finder selects the channel with the least amount of traffic for each node in your Velop system.
How to use Channel Finder? Tap Menu icon. Go to Wi-Fi Settings. Select Advanced Wi-Fi Settings. Tap Channel Finder. Tap Scan Channels. Your Velop will turn off the Wi-Fi to scan channels and all devices will be disconnected. When it finds better channels, Channel Finder will automatically make the changes for you. If your device is already using the best channels, Channel Finder will not make any changes. Tap Done.
Q: How to Reset Linksys Velop?
To reset the node to its factory defaults, press and hold until the light on top of the node turns red, fades, and flashes bright red again. Before resetting the node, make sure that the node completely boots up showing a purple light or blue light. After resetting, all the settings that you have customized such as Wi-Fi name, passwords, and security type will be erased.
Q: Is Linksys Velop router?
Yes, it does perform the work of wireless router. Using Velop, you can create a wired or wireless network. Velop will let you connect many devices to the network and it will let them access Internet through the single network. It also assigns IP addresses to devices connected to the network just like other routers.
Q: Where do I find Linksys Velop Manual?
Do u really need to use Linksys Velop manual for initial setup? You do not need it. You can do it on your own. Above are easy steps for How to setup Linksys velop. Just follow them and you are good to go.
However, if you are still looking for Linksys Velop manual then you can download it from Linksys website.
Please post your questions in the comments box below. We will try to answer your questions as soon as possible.
This is one of the best article on Linksys velop setup and settings. You will get all the required information on this article. Follow the steps and you will get your velop network up and running in minutes provided you do not have faulty device 🙂
As you said in this article, Linksys velop bridge mode is not that useful with old routers. Instead, we can use old router in bridge mode and Velop as primary router. This will be better option to improve speed and make full use of new technology. Yes, it will take time to re-design the entire network but it is worth doing it.
What happens if I follow all instructions correctly but then it can’t find the internet connection after i’ve Plugged the modem back in?
When you follow the instructions, on step 8, it will find the Internet connection. While doing the setup process, the modem will be connected to the primary node. If your modem is not connected to the Node while setup process, it will tell you that there is no Internet and check the connection.
I downloaded the manual and tried to setup second node in Bridge mode but it did not work. The second node is not picking up the wifi of the primary router which I have been using as main router and connected to the modem.
I am thinking of replacing the main router with the Primary node. What do you think.
I was looking for information to setup Velop bridge mode. I already have wireless router setup in the network which I do not want to replace as it has many settings configured. Bought new velop to add in the network to expand the wifi. But the bridge mode is not working. The entire network is working except this one.
Adding new node to the network. I already have wifi setup working and all the devices are getting Internet. I just want to add new node in the network which will go on the second floor. I already have ethernet setup which will allow me to connect new node with wired connection. So which one do you suggest? Wired connection to primary node or wireless connection?
I tried to configure Linksys velop in bridge mode but it did not work. Tried it many times. I replaced my existing Linksys E4200 wireless router and made Velop as primary router. Connected E4200 to Velop with the Ethernet cable and set it to bridge mode. Everything is working properly now. Getting good speed.